Continue Using Testflight for App Store
Update note: Michael Katz updated this tutorial for Xcode 11.5 and the corresponding TestFlight version. Dani Arnaout wrote the original post. Tom Elliott and Rony Rozen completed earlier updates.
This TestFlight tutorial will walk you through using TestFlight as part of your app's release process. TestFlight allows you to send your production-ready app to up to 10,000 testers by either sharing a link or sending an email to their Apple IDs. There's no need to collect device information from them, and they don't count against your development device limit.
In this tutorial, you'll learn how to:
- Submit your build to App Store Connect.
- Add internal and external testers.
- Start beta testing.
- Receive feedback and crash reports.
You'll also see how the process works from the testers' point of view.
This is one of those rare tutorials where you don't code. Follow the steps and you'll be up and running with TestFlight in no time! :]
Getting Started
This tutorial uses an updated version of DropCharge, from 2D Apple Games by Tutorials, as the example. Because you'll submit test builds to Apple for Beta App Review, follow along with a project of your own.
Note: You can use DropCharge to follow along for most of this tutorial, but you'll have to change the bundle ID and app name to upload the build for internal testing. The app will not pass app review, so you can't use it for external testing; you'll have to use an app of your own for that.
This tutorial assumes your app is set up for provisioning and has an app ID created in both the Developer Portal and on App Store Connect.
This setup is outside the scope of this tutorial, but you can get all the information you need on submitting an app and getting it published on the App Store in our two-part tutorial How to Submit An App to Apple: From No Account to App Store.
Submitting Your Build to App Store Connect
Once you get the hang of it, the TestFlight process is simple. You need to perform the following steps:
- Archive your app.
- Upload the archive to the App Store.
Archiving Your App
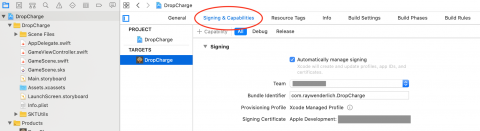
Open your project in Xcode. In the target editor, under Signing & Capabilities, make sure you have a Bundle Identifier and that your Team and Signing Certificate are set. If you're not using an app of your own, you will have to change the bundle ID to something unique.
Now, build and archive the app. This is a way of compiling the app and exporting it in a package that gets uploaded to the App Store.
First, choose Generic iOS Device in the scheme chooser:

Then, create an archive using the Product ▸ Archive menu:

If everything is OK with the build, Xcode will open the Organizer with your app in the Archives tab.

Click Distribute App:

Next, you'll choose your distribution method. Select App Store Connect, as this is how you distribute when using TestFlight and when publishing on the app store. Click Next.

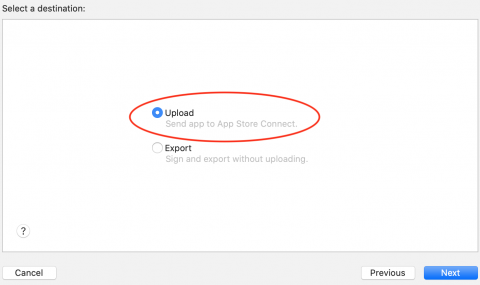
Now, select the destination. Leave Upload selected and click Next. The Export option is for saving the signed archive and uploading it later using a different tool.
Xcode will prepare to submit your app; this includes checking your App Store credentials. App Store will show a prompt with distribution options, and Xcode will select all the checkboxes by default. Leave them like this and click Next.

The two options shown above are:
- Include bitcode for iOS content: This allows the App Store to recompile and optimize your code for new devices later. It's rare you'll need to disable this.
- Upload your app's symbols to receive symbolicated reports from Apple: This uploads debug symbols along with the app so that you get symbolicated crash reports. This is helpful when doing TestFlight testing.
The next screen asks for distribution signing options. You can choose automatic signing or manually select your distribution certificate and provisioning profile. Letting Xcode manage your signing makes life easier most of the time. But if you're managing the signing yourself, select the second option along with the relevant certificates. When you're ready, click Next.

Note: You must already have an App Store distribution certificate. Otherwise, this prompts you to create one.

If prompted, export the signing certificate and store it in a safe place.
Uploading the Archive to the App Store
Once Xcode finishes doing some of its magic, it presents a summary page for the app you're about to submit. Click Upload.

Note: If you get a "[n]o suitable application records were found" error, this means one of two things: Either you didn't first create a new app in App Store Connect, or the bundle identifiers do not match. Make sure you've agreed to all the terms and signed all the contracts within App Store Connect.

Your app will start uploading to App Store Connect. Xcode displays various messages as it compiles, verifies and signs your app.

When the upload finishes, you'll see the following message:
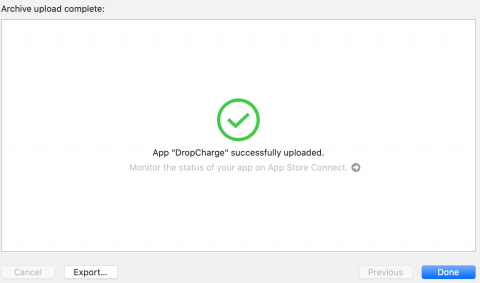
You can now smile and click Done. :]
That's all the work required from Xcode. Your beta build is now available on App Store Connect, which is where you'll do the rest of the work to set up TestFlight.
Types of Testers
Your build is now ready for testing, but who's going to test it?
Apple defines two types of testers for TestFlight:
- Internal Tester: This is an App Store Connect user who has an Admin, App Manager, Legal, Developer or Marketer role with access to your app. This is usually a team member or a client for whom you're developing an app. You can add up to 100 internal testers, and each member can test on up to 30 devices.
- External Tester: This is any user outside of your team who wants to test your app. External testers have no access to your App Store Connect account, and they can only download and install the app. You can add up to 10,000 external testers.
Before your external testers can test your app, you must submit your app to Apple for review like you would with a regular App Store submission. These reviews tend to be quicker than normal app reviews, but there's no guarantee. Once approved, you can send your app to external testers.
As soon as App Store Connect completes processing a build, it notifies all internal testers. External testers get a notification after Apple finishes performing a beta app review to make sure the app follows the App Store Review Guidelines. To control who gets specific builds, use different external test groups. You'll learn more about external testers, and how to submit for beta app review later; for now, you'll focus on internal testers.
Adding Internal Testers
To add an internal tester, head to the Users and Access section in App Store Connect. For this example, use your own email address. If you were adding other internal testers, you'd use their email addresses and they would carry out the steps of accepting an invitation.

Click the + button to add a new user. Then, fill in your new user information using an email address you have access to.
Note: If the email address entered isn't associated with an Apple ID, your tester will have to create an Apple ID to accept the invitation. This only applies to internal testers, as they need to access App Store Connect.
Now, assign a role for the new user. View the privileges for each role by clicking on See Permissions and choose the appropriate one. You can also choose to either limit access to a single app via the Apps drop-down or leave the default All Apps access.
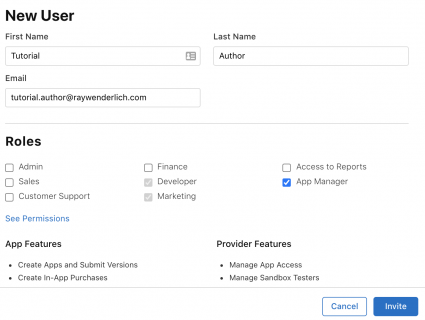
If you're unsure which role to choose, use App Manager, which allows beta testing management and the ability to download apps. Once you're done setting up your new user, click Invite. This sends an email to the new user, and the user must accept the invitation before you can select that person as a tester.
![]()
Go to the inbox for the new user's email address, find the email entitled You've been invited to App Store Connect and click Accept Invitation. Once you're done with this process, the new user is eligible to be an internal tester.

Creating a new internal beta tester is only the first part of the process. The remaining step is to invite this particular person to test your latest build.
It's time to enable testing on your app so the tester actually has something to test! :]
Starting Beta Testing
To start beta testing your app, go to the My Apps section on the App Store Connect home page and click your app:

Select the Activity tab. This is where you'll find the build you uploaded earlier. If it's still marked as Processing, go make yourself a cup of coffee and come back later. :]

Next, click the TestFlight tab. You may notice a yellow warning sign next to the build you'd like to send to internal testers. If this is the case, click the warning sign and complete the required steps.

Once you're done, the build status will change to Ready to Test:

Next, click App Store Connect Users from the menu on the left. You'll see a searchable list of your internal testers. Select the ones you'd like to add as internal testers for this build and click Add.

All selected testers will receive an email with a link to download and install this build via the TestFlight app. You'll find detailed information on the testers' point of view later in the tutorial.
But first, it's time to learn how to add external testers.
Adding External Testers
First, click Test Information from the menu on the left and fill in the necessary information. This includes:
- Beta App Description
- Feedback Email
- Contact Information
Providing this information is necessary when submitting a build for external testing. Once completed, click Save.

Now, click Add External Testers from the menu on the left. App Store Connect asks you to create a new testing group. It's up to you how you choose to manage your groups. You can have one group for all your testers, different groups for different types of testers or different groups for different apps. For this tutorial, you'll create one group called Top-Testers.

Once you've created the group, you can start adding external testers to it.
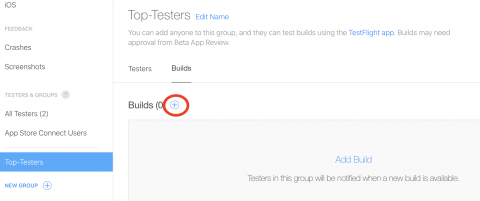
Click + next to Testers(0) under Top-Testers:

You can choose between adding new testers manually, adding existing testers — people already testing another one of your apps or builds — or importing testers from a CSV file. For this tutorial, you'll add new testers manually. Choose Add New Testers and click Next.

Add the email addresses and first and last names of any external testers you want to add. Once you're finished, click Add. You can always add more external testers by clicking the + button on the testing group page. Each person you add counts toward your limit of 10,000 external testers.


Selecting a Build
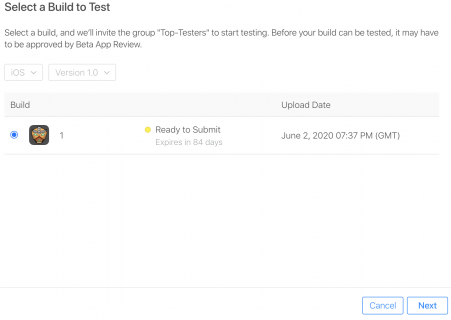
You now need to select a build for your external testers to test. On the Builds tab, click the + button:
Then, select your build and click Next:
Note: You might be wondering why you select the build for your internal and external testers separately. Well, you may want your internal and external testers to be testing different builds.
For example, your internal testers might test your master build, while your external testers test your next release candidate. By making you select builds independently for internal and external testers, App Store Connect allows this kind of separation. You can also use this to select different builds for different testing groups.
App Store Connect may ask more questions, such as whether the app requires sign-in or not. Complete the remaining steps, including providing the testing information that's displayed to your external testers.

Automatically notify testers is already checked. Uncheck this box if you want to manually notify testers when a build is available. Once complete, click Submit for Review.
App Store Connect adds your app to the review queue and changes its status to Waiting for Review. To get approval, your build must comply with the App Store Review Guidelines. Approval usually takes no more than 48 hours.
Once Apple approves your version of the app, subsequent builds won't need a review until you change the version number.
When the app has passed Beta App Review, you'll receive an email with confirmation that your app can begin external testing. If you checked the Automatically notify testers checkbox, your external testers will receive notification emails at this point. Otherwise, you'll have to go back to App Store Connect to start testing. Your external testers will then receive an invitation email.
Note: A build is only valid for 90 days. If you want your testers to use the app beyond that, you'll have to upload a new build before the expiration date and your testers will have to download that new build.
Inviting by Link
Instead of adding external testers by email, you can create a public link that allows anyone to install the app. This is useful when you don't know your testing group ahead of time, such as with a public beta test.
Under Public Link, click Enable Public Link.

Note: If you don't yet have a build enabled for this group, you can add one under the Builds tab above. If the build is not yet reviewed, it will prompt you to submit it for review and you'll have to wait for approval.
App Store Connect double-checks that you're sure you want to proceed. You'll then get a TestFlight link you can share any way you'd like. This link works exactly the same way the invitation email does: The tester will have to open it on the target device. The page will prompt the user to install the TestFlight app if they don't already have it, and then it will allow them to install your app through TestFlight.

In one sense, the link is more convenient than the invitation email. But be careful when sharing it! Testers invited through the link count against your 10,000-tester limit, but you can set your own limit to reduce the number of people who can get the app through the link. This is in case you don't want to give away 10,000 free copies of your app.
This concludes your look at the developer's perspective of app testing. Now you'll read about what it looks like from the tester's perspective.
Testers' Point of View
This section covers what's required for your tester to access the available build. It's wise to be familiar with this part of the process because questions will come up!
Accepting the Invitation
Both internal and external testers receive similar emails from TestFlight. This email will invite the user to view the app in TestFlight.

The link looks a little different in that it lays out the two steps: downloading TestFlight and app installation. Otherwise, the process is pretty much the same as when it's done by email.

Installing TestFlight
Links from both invitations bring the user to TestFlight in the App Store:

The user will download the TestFlight app and launch it.
Redeeming Your App
When a new build is available, or when you add a new tester, the tester receives an invitation to test the build via TestFlight.
Note: If you're following along in real time, it's unlikely App Store review has time to approve your build. As such, your app will only be available to internal testers at this point.
After opening the invitation and clicking View in TestFlight, TestFlight will launch and redeem the invitation using the Apple ID currently in use in the TestFlight app.
Then users will see an app preview page. This will show the app icon, build number and the testing information you provided. The screen will look something like this:

Note: The View in TestFlight link in the email works via universal links, so if it doesn't open TestFlight for whatever reason, users can copy the link and open it in Safari. They'll then see a redemption code they can copy and paste into the TestFlight app.
After tapping Install, the app will download and appear on the home screen. Now, users can treat it like any other app. It'll have an orange dot near the name in SpringBoard to show it's a TestFlight install.

Running the App
When testers first launch the app, they'll see the same test information screen as before. There's also a second screen with instructions on how to take a screenshot, along with a link for more information. This is a handy reminder to the tester of what to look for and how to provide feedback.

From now on, whenever a new version of this app is available, users will see a notification from TestFlight. All they need to do is update the app and run the latest version.
Giving and Receiving Feedback
TestFlight gives testers several ways to provide feedback to you, the developer.
The first is through the screenshot mechanism. If the user takes a screenshot of the app, they'll get a Share Beta Feedback… option. This appears either through the share action in the editing pane or right after they tap Done.

When users choose this option, they'll get a chance to add a note — hopefully one including useful information and reproduction steps. :]

Users can also leave feedback through the TestFlight app. This brings up the same share sheet as the screenshot feedback. Through this method, users can attach any photo from their library or none at all.
Finally, the user can jump to this share mechanism in the TestFlight app with an app shortcut on the home screen.

Getting the Feedback
Once a tester submits feedback, it will appear in App Store Connect in the TestFlight tab. In the left navigation panel, there will be a Feedback section with a menu item for Screenshots. This is where all feedback sent through the TestFlight app goes, whether there's an image attached or not.

Clicking an item will show the screenshot, the feedback the user entered and information about the user and the user's device. This includes the user's email, how long they used the app, the operating system and device and other metrics like their amount of battery and free disk space.

This will provide you with enough information to start debugging, and if not, a way to contact the user to get more information.
Crash Reports
In addition to sending feedback, TestFlight-installed apps get special privileges when it comes to crash reports. If the app crashes, an alert will pop up to give the user a chance to send that crash report to the developer.

If the user taps Share, the crash report uploads to App Store Connect for you to see. These reports appear as feedback items under the eponymous Crashes menu.

Crash reports contain the same information as other feedback, including information about the user and the device, along with anything they typed in the share sheet. If you click the Download button, it will download this information and a .crash file you can open in Xcode. This will help you figure out how to fix the issue.

Where to Go From Here?
In this TestFlight tutorial, you learned how to upload your test build, invite internal and external testers to your app, start beta testing and gather feedback from your testers. You also saw how this process works from the testers' point of view.
If you're interested in learning more about App Store Connect in general, and beta testing in particular, read through Apple's TestFlight Beta Testing Documentation.
Apple's Developer site also has a summary page for TestFlight, which includes links to all the relevant documentation, as well as a video, iTunes Connect: Development to Distribution, outlining the TestFlight process.
If you want to learn more about the process of submitting apps to the App Store, and not only the beta testing aspect of it, check out our two-part tutorial How to Submit An App to Apple: From No Account to App Store.
Finally, there is an App Store Connect API. This API allows you to invite testers, upload builds, set test and compliance information and more. You can use this in your CI/CD tools. Even better, if you use fastlane, all that automation is already integrated. Check out our fastlane tutorial for more information.
We hope you enjoyed this TestFlight tutorial. If you have any questions or comments, please join the forum discussion below!
Source: https://www.raywenderlich.com/10868372-testflight-tutorial-ios-beta-testing
0 Response to "Continue Using Testflight for App Store"
Post a Comment